Property Photography Tips for Kenya Agents: How to Shoot Listings That Sell (Smartphone Guide)
How to photograph property listings with a smartphone. Staging checklist, camera settings, 10-shot sequence, editing tips, vacant land, and video guide.
Property Photography Tips for Kenya Agents: How to Shoot Listings That Sell (Smartphone Guide)
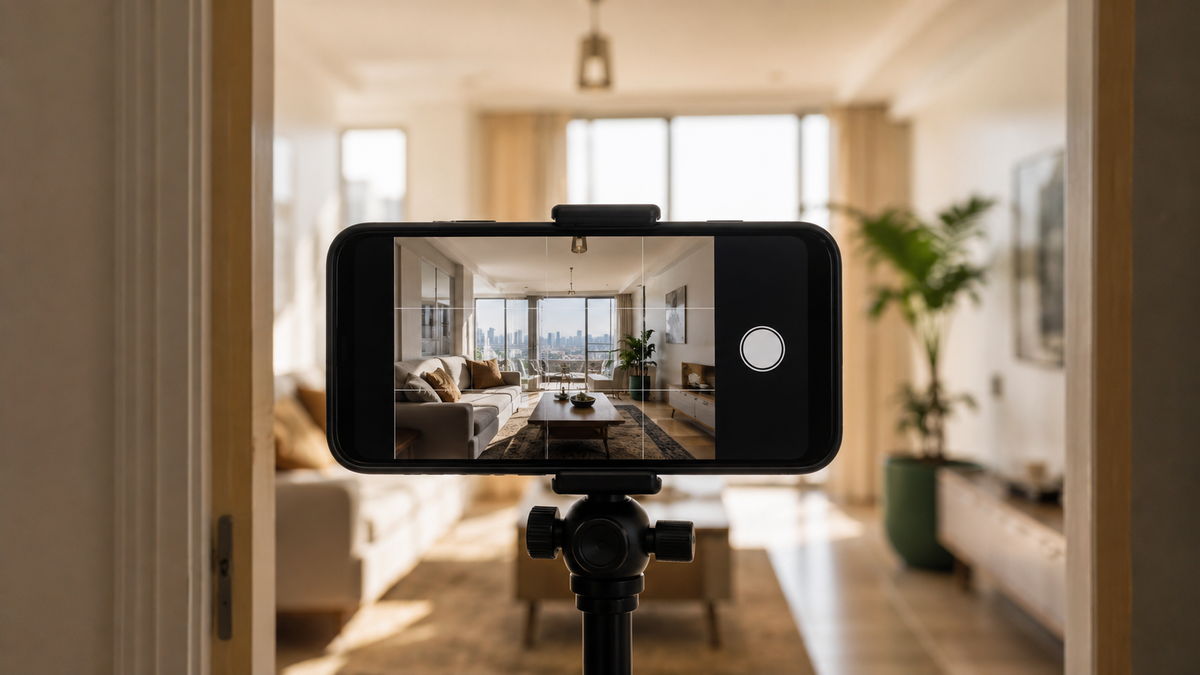
In Kenya's real estate market, your listing photos are your first showing. Before a buyer calls, visits, or sends a WhatsApp message, they judge your property — and you as an agent — based on 3–5 images on a screen. Listings with clear, well-lit, properly composed photos consistently generate more inquiries than listings with dark, blurry, or poorly framed images. On Afriqahome, listings using all 10 photo slots with quality images outperform sparse listings by a significant margin in both views and inquiry conversion.
The good news: you do not need a DSLR camera, a drone, or a professional photographer. A modern smartphone (any phone released in the last 3–4 years), natural light, and the techniques in this guide will produce listing-quality photos that compete with — and often match — professional shots. This guide is written for Kenya agents who shoot their own listings, which is most of us.
Before You Shoot: Preparation Is Half the Work
The biggest difference between amateur and professional-looking listing photos is not the camera — it is what happens before the shutter clicks. Spend 15–20 minutes preparing the property and you will cut your shooting time in half while getting dramatically better results.
Staging Checklist (15 Minutes)
Area | What to do | Why it matters |
|---|---|---|
All rooms | Open every curtain and blind. Turn on every light — even in daylight. | Maximises light. Eliminates dark corners. Mixed light (natural + artificial) reduces harsh shadows. |
Kitchen | Clear countertops completely. Remove dishes, appliances, bottles. Wipe surfaces. | Clutter kills photos. Empty counters make the kitchen look larger and cleaner. |
Bathrooms | Close toilet lids. Remove personal items (toothbrushes, towels on the floor). Wipe mirrors. | Bathrooms photograph terribly when messy. Clean = modern. Messy = neglected. |
Bedrooms | Make beds neatly. Remove clothes from chairs and floors. Straighten pillows. | A made bed is the single most impactful staging action in any bedroom. |
Living room | Straighten cushions. Remove clutter from coffee tables. Arrange furniture symmetrically. | Symmetry and clean lines create a sense of order that photographs well. |
Exterior | Move cars and wheelbarrows out of frame. Close dustbins. Pick up litter. | The exterior is your hero shot — first impression. Anything distracting weakens it. |
Compound/garden | Trim grass near the entrance if possible. Clear the pathway. | Shows the property is maintained, not abandoned. |
Camera Settings: Get These Right Before Shooting
Setting | What to use | Why |
|---|---|---|
Lens | Ultra-wide (0.5x–0.6x) for interiors. Standard (1x) for exteriors and details. | Ultra-wide captures entire rooms in one frame without stepping into hallways. Standard avoids the fisheye distortion on exterior shots. |
HDR | ON (automatic on most modern phones) | Balances bright windows and dark interiors. Without HDR, windows blow out white or interiors go black. |
Flash | OFF — always | Phone flash creates harsh, unflattering light with sharp shadows. Natural light is always better. |
Grid lines | ON (enable in camera settings) | The grid helps you keep vertical lines straight. Tilted photos look amateur. |
Orientation | Landscape (horizontal) — always | Listing platforms display photos in landscape format. Portrait photos get cropped awkwardly. |
Height | Chest height (approximately 1.2–1.5 metres) | Shooting from chest height matches natural eye level and avoids distorted floor/ceiling proportions. |
Pro tip: Use your phone's self-timer (2–3 seconds) to avoid camera shake when pressing the shutter button. Even steadier: lean your phone against a door frame or wall. A basic phone tripod (KES 500–1,500 on Jumia) eliminates shake entirely and is the single best investment for listing photography.
The 10-Shot Sequence: What to Photograph and in What Order
Every property listing should follow a logical visual journey — the same path a buyer would walk during a physical viewing. This sequence was introduced in our marketing tips guide. Here we expand on how to actually shoot each one.
Shot 1: Exterior Hero (The Thumbnail)
This is the most important photo in your listing. It appears as the thumbnail in search results — the image that determines whether someone clicks or scrolls past.
Position: Stand at a 30–45 degree angle to the front of the property, not dead centre. Angles add depth and dimension.
Time: Shoot between 10am and 2pm when the sun is high and shadows are minimal. Avoid shooting into the sun — keep it behind you or to the side.
Include: The full building frontage, entrance, some sky, and landscaping if present. For plots (vacant land), stand at one corner and shoot diagonally across to show the full parcel with boundary markers visible.
Exclude: Cars, dustbins, construction debris, neighbouring buildings in poor condition, power lines where avoidable.
Lens: Standard (1x) — ultra-wide distorts buildings.
Shot 2: Living/Sitting Room
Stand in the doorway or a corner to capture the widest possible view. Use the ultra-wide lens (0.5x). Aim to include at least two walls and the floor. Show the natural light coming through windows — this is a major selling point for Kenyan buyers. If the room has a view, include the window with the view visible (HDR will balance the brightness).
Shot 3: Kitchen
Stand at the kitchen entrance and shoot towards the counters and cabinets. Show the countertop surface, appliances (if built-in), and storage. If the kitchen is small, use the ultra-wide lens to make it appear more spacious — but avoid extreme distortion.
Shot 4: Master Bedroom
Shoot from the doorway looking in. Include the bed (made neatly), the window (for natural light), and any built-in wardrobes. If the room has an en-suite, leave the bathroom door open so the viewer can see it exists.
Shot 5: Master En-Suite / Main Bathroom
The most challenging room to photograph because bathrooms are small, reflective, and unforgiving. Stand in the doorway. Close the toilet lid. Include the shower or bathtub, the vanity/sink, and the mirror (but check that you are not visible in the reflection). Turn on the light to eliminate dark corners.
Shot 6: Second Bedroom or DSQ
Same approach as the master bedroom. For DSQs (Domestic Staff Quarters), show the full room and any en-suite. Diaspora buyers particularly want to see the DSQ — it indicates the property can accommodate domestic staff or generate secondary rental income.
Shot 7: View from Balcony or Compound
If the property has a balcony, rooftop, or garden, stand in it and shoot outward to show the view and surrounding environment. This gives buyers neighbourhood context. For apartments, shoot from the balcony to show the view and natural surroundings. For houses, step into the garden and shoot back toward the house — this shows the compound size.
Shot 8: Parking / Gate / Entrance
Security and access are top priorities for Kenyan buyers. Show the gate, parking area, and security features (guards booth, CCTV cameras, perimeter wall). For apartments, show the lobby, lift area, or common entrance.
Shot 9: Amenity (Gym, Pool, Playground)
If the development has shared amenities, photograph the best one. A clean pool, a modern gym, or a children's playground adds perceived value. If there are no amenities, use this slot for the best architectural detail — a staircase, a ceiling design, or a feature wall.
Shot 10: Street View / Neighbourhood Context
Step outside and photograph the immediate surroundings: the access road, nearby landmarks, and the general environment. This is especially important for satellite-town properties where buyers may not know the area. Show tarmac roads (if applicable), streetlights, and any commercial developments nearby.
The 5 Most Common Photography Mistakes Kenya Agents Make
Mistake | What it looks like | How to fix it |
|---|---|---|
Portrait orientation | Tall, narrow photos that get cropped on listing platforms | Always shoot landscape. Turn your phone sideways. |
Shooting into the sun | Dark interior, blown-out windows, silhouetted rooms | Keep the sun behind you. Shoot interiors between 10am–2pm. Use HDR. |
Including yourself in mirrors | Agent visible in bathroom mirror or glass door reflection | Check reflective surfaces before shooting. Angle the shot to avoid mirrors, or stand to the side. |
Too few photos (2–3 only) | Buyer cannot visualise the property and moves on | Use all 10 slots. More photos = more information = more confidence = more inquiries. |
Clutter in frame | Unmade beds, shoes on the floor, dishes on the counter | Spend 15 minutes staging before you shoot. Move anything that does not belong. |
Editing: Quick Fixes That Make a Big Difference
You do not need Photoshop. Your phone's built-in editor (or the free Snapseed app) handles everything a listing photo needs:
Brightness: Increase by 10–20%. Bright rooms sell. Dark rooms do not.
Contrast: Slight increase (5–10%) to make details pop.
Straighten: If the photo is slightly tilted, use the straighten tool. Vertical lines (door frames, walls) should be perfectly vertical.
Perspective correction: Snapseed's "Perspective" tool fixes leaning buildings in exterior shots.
Crop: Remove distracting elements at the edges (a dustbin corner, a construction site glimpse).
Do not over-filter. Heavy filters, extreme saturation, or HDR effects that make rooms look unrealistic will disappoint buyers at the viewing. The goal is to represent the property accurately but at its best — the same principle you would use when dressing for a client meeting.
Video Walkthroughs: The Next Level
Once you are comfortable with photos, add video. A 30–60 second walkthrough filmed on your phone gives remote buyers (especially diaspora) a spatial understanding that photos cannot match. Basic rules:
Hold the phone horizontally (landscape) at chest height
Walk slowly — much slower than you think
Narrate the key features as you walk ("this is the master bedroom, 15 by 18 feet, with an en-suite and built-in wardrobes")
Start at the gate, end at the best feature
Keep it under 60 seconds — attention spans are short
Upload to Instagram Reels, YouTube Shorts, TikTok, and WhatsApp Status
For detailed video marketing strategies, see our marketing tips guide.
For Vacant Land: Photography Without a Building
Photographing an empty plot is harder than photographing a house — there is nothing to anchor the viewer's eye. Strategies:
Corner-to-corner diagonal: Stand at one corner and shoot diagonally across the entire parcel. This shows the full area and any boundary markers.
Show the access road: Photograph the road leading to the plot, including tarmac quality and road width.
Include landmarks: If there is a school, mall, or development visible from the plot, include it in the frame to give location context.
Show utilities: Photograph nearby power lines, water pipes, or transformer positions — these reduce buyer concerns about infrastructure availability.
Boundary markers: If the plot has beacons or fencing, show them. This visual proof of surveying builds trust.
Use Google Maps screenshot: Include a zoomed-in satellite view as one of your listing images to show the plot's location relative to roads and developments.
How Better Photos Connect to More Leads on Afriqahome
On Afriqahome, the listing thumbnail (your Shot 1 hero photo) is what buyers see in search results. A sharp, well-lit exterior photo stops the scroll. A dark, blurry photo gets skipped. Once a buyer clicks, listings with 8–10 complete photos hold attention longer and convert to inquiries at higher rates.
Combined with accurate pricing, a strong agent brand, and Spotlight Boost for top placement, quality photos are one of the four pillars that drive listing performance. They cost nothing to improve — only attention and 15 minutes of staging.
Register as an agent on Afriqahome and put these techniques to work on your next listing.
Frequently Asked Questions
Can I take professional-quality listing photos with a smartphone?
Yes. Any smartphone released in the last 3–4 years has the camera quality needed for listing photos. The difference is not the camera — it is the preparation (staging), settings (ultra-wide lens, HDR on, flash off), composition (chest height, landscape orientation), and basic editing (brightness, straighten, crop). A phone with good light and good technique consistently produces listing-quality results.
How many photos should a property listing have?
Use all available slots — on Afriqahome, that is 10. Listings with 8–10 photos generate significantly more inquiries than listings with 2–3. Follow the 10-shot sequence: exterior hero, living room, kitchen, master bedroom, master bathroom, second bedroom/DSQ, view/compound, parking/entrance, amenity, and street view.
What is the best time of day to photograph a property?
Between 10am and 2pm, when the sun is high and casts minimal shadows. Avoid early morning and late afternoon when low sun creates harsh directional shadows and glare. Turn on all interior lights even during daylight — the combination of natural and artificial light eliminates dark corners.
Should I use the ultra-wide lens for all photos?
Use ultra-wide (0.5x–0.6x) for interiors — it captures the full room in one frame. Use the standard (1x) lens for exteriors — ultra-wide distorts buildings and makes them look unnatural. Never use ultra-wide for detail shots (kitchen fixtures, bathroom finishes) — it stretches edges and misrepresents proportions.
How do I photograph vacant land when there is no building?
Stand at one corner and shoot diagonally across the plot to show full area. Photograph the access road, nearby landmarks, utility infrastructure (power lines, water), and boundary markers. Include a Google Maps satellite screenshot as one of your images to show location context. These elements give buyers the spatial and infrastructure information they need.
What editing app should I use for listing photos?
Snapseed (free, by Google) is the best free option for Kenya agents. It handles brightness, contrast, straightening, perspective correction, and selective adjustments. Your phone's built-in editor also works for basic adjustments. Avoid heavy filters or extreme HDR effects — the goal is realistic but optimised, not artificial.
Explore Further
Other Guides
Living in Juja, Kiambu: The University Town That Became a Satellite City — Prices, Estates & Honest Guide (2026)
Juja houses from KSh 1.2M, rent from KSh 2.5K. JKUAT area, Kenyatta Road estates, Kalimoni, Witeithie. Student yields 9-15%.
Westlands Property Guide: Prices, Lifestyle & Investment (2026)
Complete guide to Westlands real estate. Apartments from KES 8M, rental yields 6-8%, plus lifestyle amenities. Browse verified Westlands listings today.
Houses for Sale in Karen: Price Guide 2026
Karen house prices from KES 35M–250M+. 4-bedroom, 5-bedroom, villas. Karen Hardy, Ndege Road, budget breakdown. Updated March 2026.